
Here’s a detailed step-by-step approach to help you successfully install an internal door.
Tools and Materials You’ll Need
- Tape measure
- Screwdriver or electric drill
- Hammer
- Saw (hand saw or circular saw)
- Wood chisel
- Spirit level
- Pencil
- New internal door
- Hinges (usually two or three per door)
- Screws (appropriate size for hinges)
- Door handle and latch set
Step-by-Step Guide to Installing Internal Doors
- Measure Your Door Frame:
Before purchasing your new door, take precise measurements of the existing door frame. Measure the height, width, and depth of the frame to ensure the new door will fit correctly. - Prepare Your Workspace:
Clear the area around your workspace to allow for easy movement and ensure you have adequate lighting. Place your tools within reach to avoid interruptions once you start working. - Check the New Door’s Fit:
Place the new door into the frame without attaching anything yet. Check if it fits snugly or requires trimming. - Use a pencil to mark where adjustments are required.
- Remove material gradually using a saw or planer.
- Mark and Attach Hinges: To properly secure your internal door:
- Lay the door flat on a workbench or sawhorses.
- Position hinges on both sides of the door (typically about six inches from both ends). Mark their outline with a pencil.
- Use a chisel to create shallow recesses for each hinge on both the door edge and frame.
- Securely screw hinges onto both surfaces.
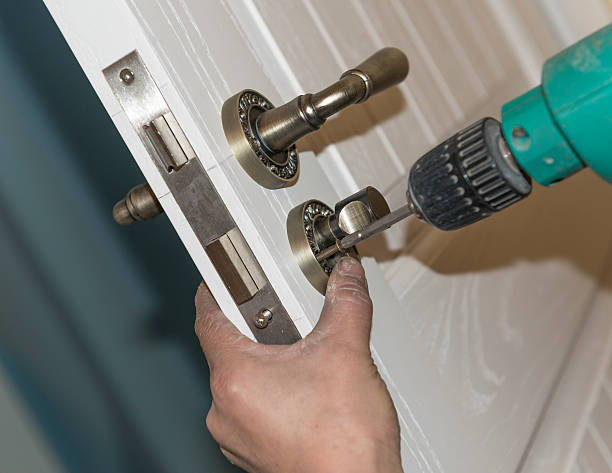
- Install Door Hardware: Next, fit essential hardware like handles and latches:
- Follow manufacturer instructions for drilling holes in precise locations.
- Insert latch mechanisms into pre-drilled spaces before attaching handles securely.
- Hang Your Door: With hinges now attached:
- Lift/align doors carefully** (Tighter tightened anything else Sections
Expert Door Installation Rockville, MD: Perfectly Fitting Your New Door
Proper preparation and accurate cutting of a new door are crucial steps to ensure a seamless installation. A well-fitted door not only enhances the overall aesthetics of your space but also ensures smooth functionality. Below is a detailed guide to help you cut and prepare your new door to fit the opening perfectly.
Essential Tools and Materials from a Door Company in Rockville, MD
- Tape measure
- Straight edge or ruler
- Pencil or marking tool
- Saw (circular saw or handsaw)
- Sandpaper (medium and fine grit)
- Plane (manual or electric)
- Clamps (optional)
- Safety gear: goggles, gloves, ear protection
Tips for Measuring Your Door Opening for Door Repair Rockville, MD
- Measure the Frame Dimensions: Start by measuring the height, width, and thickness of the door opening. Measure in multiple spots to account for any irregularities in the frame.
- Account for Clearance: Leave a small clearance of 2–3mm on each side of the door for smooth movement. Additionally, allow about 10mm at the bottom if installing over flooring.
- Double-check Your Measurements: Always verify your dimensions before making any cuts.
Marking and Cutting the Door
- Mark the Cut Lines: Lay your new door flat on sawhorses or a sturdy surface. Using your measurements, mark where adjustments need to be made with a pencil.
- Use a Straight Edge: Place a straight edge along the marks to ensure accuracy when cutting.
- Secure Before Cutting: Clamp down the door if possible to prevent movement during cutting.
- For minor adjustments along edges, use an electric plane for controlled trimming.
- For larger reductions in size, use a circular saw with a fine-tooth blade for clean cuts.
Tip: If you’re using a saw, cut slowly and steadily to prevent chipping or splintering.
Smoothing Edges
- After cutting, sand down all edges using medium-grit sandpaper followed by fine-grit sandpaper for smoothness.
- Pay special attention to corners where splinters may occur during cutting.
| Sandpaper Grit | Purpose | Recommended Use |
| Medium (120) | Remove rough surfaces | After initial cuts |
| Fine (240+) | Finish smoothing edges | Final touch-ups |
Adjusting Thickness if Necessary
Some doors may require minor adjustments in thickness if they don’t match your frame size exactly.
- Use an electric plane along areas that feel too tight when tested against the frame.
- Remove material gradually and recheck frequently until it fits perfectly.
Sealing Cut Edges
Exposed wood edges can absorb moisture over time, leading to warping or damage.
- Apply wood sealant or primer on all freshly cut surfaces.
- Allow it to dry completely before proceeding with installation.
By carefully measuring, accurately cutting, and properly sealing your new door during preparation, you’ll ensure it fits perfectly into its frame while maintaining durability over time.
Cutting and Preparing a New Door to Fit Your Door Opening Perfectly
Properly cutting and preparing a new door to fit your door frame is a crucial step in any door installation. Here’s how you can ensure your new door fits perfectly into your existing opening.
Tools You’ll Need
- Measuring tape
- Pencil or marking tool
- Circular saw or hand saw
- Sandpaper (medium and fine grit)
- Wood plane (optional)
- Clamps
- Straight edge or ruler
- Safety gear (goggles, gloves)
Having these tools ready will save time and ensure the work is seamless.
Steps to Cut and Prepare Your Door
- Measure the Door Opening
To achieve an accurate fit, measure the width, height, and thickness of your door frame. Write down these dimensions for reference. Measure at multiple points (top, middle, bottom) to account for any irregularities in the frame. - Mark Your Cut Lines
Using your measurements as a guide, mark cut lines on the new door with a pencil. Double-check these marks against the frame before making any cuts. - Use a circular saw or hand saw to carefully trim along the marked lines.
- Always follow manufacturer recommendations regarding trimming limits — cutting too much could void warranties or compromise structural integrity.
- For small adjustments or fine-tuning, use a wood plane instead of a saw.
- Sand Down Edges
After cutting, smooth any rough edges with medium-grit sandpaper. Follow up with finer grit sandpaper for a polished finish that prevents splintering. - Test Fit
Place the trimmed door in its frame to test for fit: - Ensure there’s an even gap of about 2–3 mm between the edges of the door and frame.
- If adjustments are needed, repeat trimming/sanding until satisfied.
Important Considerations
| Issue | Solution |
| Uneven Frame | Use shims during installation to compensate for irregularities in older frames. |
| Hollow-Core Doors | Avoid cutting large sections from hollow-core doors as this may weaken their structure; stick close to manufacturer guidelines. |
| Preserving Veneers | When working with veneered doors, use masking tape along cut lines before sawing to prevent chipping of the veneer layer. |
Final Preparations Before Installation
- Apply wood primer or sealant on trimmed edges if necessary; this step prevents moisture absorption that can cause warping over time.
- Check alignment once more by placing it back in position.
- Proceed by marking hinge positions if they aren’t pre-drilled already—this will make hanging easier later on.
By following these steps methodically and accurately, you’ll ensure not only that your new interior door looks great but also operates smoothly within its designated space without unnecessary gaps or friction points throughout its lifespan.

Essential Tips for Fitting Hinges During an Internal Door Installation
When installing an internal door, fitting hinges correctly is a crucial step to ensure that the door functions smoothly and aligns properly with the frame. Proper hinge installation not only enhances the door’s functionality but also extends its longevity. Below are essential tips and techniques to help you fit hinges accurately during your internal door installation project.
Tools and Materials Needed
- Screwdriver or drill (preferably with a screwdriver bit)
- Chisel (sharp, preferably 1-inch wide)
- Hammer or mallet
- Measuring tape
- Pencil or marking tool
- Hinges (ensure they are the right size and type for your door)
- Screws (usually provided with the hinges)
Having these tools ready will ensure a smooth workflow during the installation process.
Choosing the Right Hinges
Selecting the appropriate hinges is important for both functionality and aesthetics.
- Hinge Type:Some common types include butt hinges, concealed hinges, and spring-loaded self-closing hinges. Butt hinges are most commonly used for interior doors.
- Material:Opt for durable materials like stainless steel or brass to avoid rusting over time.
- Size:Standard interior doors often require 3-inch or 4-inch hinges, but thicker or heavier doors may need larger sizes.
Marking Hinge Placement
- Determine Placement on Door Frame:Typically, two standard hinge positions are used: one at about 6–7 inches from the top of the door and another approximately 9–10 inches from the bottom.
- Transfer Marks Onto Door Edge:Use a pencil to mark hinge positions on both the door edge and corresponding spots on the frame.
- For taller doors or added stability requirements, consider adding a third hinge midway between your top and bottom hinge positions.
Cutting Hinge Mortises
- Using your pencil marks as guides, place one side of each hinge flush against its position on both surfaces (door & frame). Then trace hinged outlines inside those areas.
A Comprehensive Guide to Hanging Your Interior Door Correctly
This guide walks you through the essential steps to hang your interior door correctly, ensuring it functions smoothly and enhances the aesthetics of your space.
Tools You’ll Need
Before getting started, gather the following tools:
– Measuring tape: For accurate measurements of your door and frame.
– Screwdriver or drill: To secure hinges and hardware in place.
– Level: Ensures proper alignment of the door during installation.
– Chisel: Helps carve out recesses for hinges if needed.
– Pencil: For marking hinge positions accurately.
– Sandpaper or planer: To adjust or smooth edges for a perfect fit.
Step 1: Confirm the Door Fit
- Check dimensions:There should be slight gaps (around 2mm) on each side for smooth operation without rubbing against the frame. Trim if necessary using a planer or circular saw.
- Inspect clearance:Ensure there’s enough space at the bottom of the door to clear flooring (e. g. , carpet or hardwood). If trimming is required, sand edges afterward for a clean finish.
Step 2: Position Hinges Correctly
Fitting hinges properly ensures that your door opens and closes smoothly without squeaking or sagging over time.
- Mark hinge placement:Mark these positions with a pencil on both sides of your new door.
- Cut hinge recesses:Use a chisel to cut shallow recesses into both the door edge and frame where each hinge will sit flush with the surface.
- Attach hinges to the door:Securely fasten each hinge leaf onto its corresponding position on your door using screws.
- Align hinges with frame:With assistance if needed, align and mark where they’ll attach inside your doorway frame.
Step 3: Hang Your Door
- Lift or hold up your prepared door so that its attached hinges align precisely with their marked positions on the frame.
- Insert screws loosely into one side first; this allows adjustments before tightening everything fully.
- Does it open/close freely?
- Are weight distributions balanced equally upon fixing secondary points?
By addressing such basics upfront now avoids failures later such !
Beginner-Friendly Guide to Door Replacement Rockville, MD: Can You Install Interior Doors Yourself?
Installing interior doors can seem like a daunting task, especially if you’re new to home improvement projects. Below is a beginner-friendly guide to help you decide whether installing an interior door yourself is the right choice and how to get started.
Assessing Your Skill Level and Tools
Before deciding to install an interior door yourself, evaluate your current skill level and ensure you have the necessary tools.
- Have you worked on DIY projects before?
- Are you comfortable using basic hand tools like screwdrivers, chisels, and drills?
- Do you have a basic understanding of measurements and leveling?
If you’re confident in these areas or willing to learn as you go, installing an interior door may be within your capabilities.
Steps for DIY Door Installation
- Remove the Existing Door (if applicable):
Start by unscrewing hinges from the current door using a screwdriver or drill. Lift the old door out of its frame carefully. - Inspect and Measure:
Examine your existing frame for damage or uneven surfaces. Use a tape measure to record dimensions such as height, width, and depth of the opening. - Prepare Your New Door:
If necessary, trim down your new door using a saw so it fits snugly within the frame. Sand edges for smoothness. - Position Hinges:
Mark hinge locations on both the new door and frame. Use a chisel to create recesses where each hinge will sit flush against both surfaces. - Hang the Door:
Secure one side of each hinge onto the edge of your new door first. Then align it with your frame before fastening screws into place on that side as well. - Install Hardware:
Attach handles or knobs according to manufacturer instructions after ensuring proper alignment during test swings of completed assembly work beforehand.
Pros of DIY Interior Door Installation
- Cost Savings:Hiring professionals can be expensive; doing it yourself eliminates labor costs.
- Skill Building:You’ll gain valuable experience in home improvement.
- Flexibility:Work at your own pace without relying on others’ schedules.
When To Call A Professional
- Uneven frames requiring extensive leveling or repairs
- Specialty doors (e. g.
- Lack of proper tools or experience leading potentially unsafe attempts
How Long Does It Take and What Does It Cost to Install an Interior Door?
When installing an interior door, understanding the time and cost involved is critical for effective planning. Both factors can vary depending on your level of expertise, the tools at your disposal, and the specific requirements of the project.
Average Time to Install an Interior Door
The time it takes to install an interior door depends on several factors including whether you are replacing an old door or working with a new frame.
| Task | Estimated Time |
| Removing an old door | 15-30 minutes |
| Preparing the new door (cutting/trimming) | 20-45 minutes |
| Installing hinges | 10-20 minutes |
| Hanging and aligning the door | 20-30 minutes |
| Installing hardware (handle/lock) | 10-15 minutes |
Key Considerations: – Experience Level:If you’re new to DIY tasks, allocate extra time for each step.Type of Door:Pre-hung doors are faster to install compared to slab doors.Adjustments Required:Older frames may require sanding or adjustments that increase installation time.
On average, if you’re reasonably experienced with basic tools, installing one interior door from start to finish could take around 2–4 hours. Beginners might need closer to half a day.
Cost of Installing an Interior Door
Costs can vary based on material choice, labor rates (if hiring a professional), and additional hardware requirements.
Materials:
- Hollow core doors: $50–$150
- Solid wood doors: $200–$500+
- Hinges: $5–$15 per hinge
- Door Handles/Locks: $20–$100 depending on design and quality
Tools:
If you don’t already own some essential tools, you may need: – Circular saw or hand saw ($50–$150) – Screwdrivers and drill ($30–$100) – Level and measuring tape ($10–$30)
Professional Labor Costs:
Hiring a professional can increase costs significantly but ensures precision: – Typical labor rates: $75–$150 per hour – Total professional installation cost: $200–$400 per door
Tips for Saving Time and Money
- Opt for Pre-Hung Doors
Pre-hung doors come with hinges attached and fit into their own frame, reducing installation complexity. - Reuse Existing Hardware
If hinges or handles are in good condition, reusing them can help cut costs. - Plan Ahead
Measure twice before trimming or cutting anything—this minimizes errors requiring rework. - DIY Where Possible
If you have basic carpentry skills, doing it yourself saves labor costs entirely.
By having realistic expectations about time investment and budgeting for materials or labor expenses upfront, you’ll ensure a smoother installation process without unexpected delays or financial surprises.
- Comprehensive Guide to Door Replacement Rockville, MD: Fixing Cracked or Damaged Doors
- Essential Tools and Materials for a Smooth Door Replacement in Rockville, MD
- Step-by-Step Guide to Installing Doors in Rockville, MD for Beginners
- Beginner’s Guide to Door Installation Rockville, MD: Can You Replace a Door Frame Yourself?
- Comprehensive Guide to Door Repair Rockville, MD: Understanding Door and Frame Anatomy
- Exterior Door Installation Rockville, MD: The Ultimate Guide to a Seamless Process
- Important Tips for Door Repair Rockville, MD: Measuring for a New Door Handle
- Step-by-Step Guide to Door Repair Rockville, MD: How to Properly Install an Exterior Door